Tuesday 17 December 2013

Party food 2: Green Falafel

Our family have Middle Eastern roots so falafel aren't strangers at the dinner table but there are so many things you can do to make your falafel a bit out of the ordinary. These green falafel are not only really delicious but the addition of the greens also boost the vitamins and healthiness. They are also not deep fried so healthier than a lot of the falafel you can buy. This recipe was not my own but I did end up using curly kale instead of the collard greens which worked just as well (and we did make them with the greens another time). We made
Some for the party and some to keep but froze them all after frying to be defrosted and bake in the oven on the day as so much needed to be done. They were probably best fresh straight from the frying pan but also delicious after baked from frozen. A great thing for your freezer to cook after a busy day or to make for a sandwich in a lunchbox.


JULES XOXO

Wednesday 20 November 2013

Party food part 1: Mini Quiche

Over the next few posts I will (finally!) be showing you some of the recipes I used for Little Miss' 1st birthday party when she had her mini friends over to play. These include mini quiches, green falafel, spinach and bean triangles and the sugar free cakes I made too.

As well as these we had houmous, cucumber, carrot, red pepper slices, mini breadsticks, mini rice cakes, melon, satsuma and dried apricots for the mini people as well as some naughty sugary cupcakes for the exhausted parents!


The feast for the little ones
Fuel for the parents (mint chocolate, caramel coconut, ginger & lemon and pistachio & rosewater)


Today's post will be about the mini quiches. The basis of the filling is tofu, non-dairy milk, nutmeg and turmeric. To this you can add the fillings you like. For me a quiche needs onion which I like to fry before it goes in the mixture. In ours we also put peas and curly kale. Previously, when we made a big quiche, we used red pepper and broccoli which resulted in a fantastic mixture of colours and tastes.

Any shortcrust savoury pastry recipe will work with this and I tried a few out. You could even buy ready made pastry if the thought of making your own scares you (but it really is not hard to do!).

Here is a pastry recipe that you could use:

225g plain flour
100g margarine
2.5 tablespoons of COLD water

(usually this would have salt added but I left this out for the sakes of the mini people)

Mix the flour an margarine together (really helps to have a machine) and then mix in the water so it comes together as a dough. If it doesn't come together, add a little more water. If it is really sticky (it should be more firm than sticky) then add a little more flour.

Grease a bun tin (what you would make fairy cakes in). Roll out the pastry on a floured surface with a floured rolling pin until it is a couple of mm thick. Cut out circles that will fit into the bun tin using pastry cutters and press into each depression. Put a little greaseproof paper onto the bottom of each one and then put a few baking beans onto this. Blind bake (i.e. without the filling) for 10 minutes in a preheated oven at 180 degrees celcius.

While these are baking you can prepare your filling.

Essential Ingredients:
400g block of firm tofu
1/3 cup soya milk
1/2 tsp nutmeg
1/2 tsp turmeric
Pepper to taste (salt too if you want to)

What I used as well:
1/2 large red onion, chopped
Cup of frozen peas
2 cups of curly kale

Fry any vegetables which you think need it. I did this to the onion and lightly fried the kale also. I would be inclined to fry or even roast red pepper to release that lovely flavour even more.

In a food processor, blend all the essential ingredients together. This doesn't have to be completely smooth (I like it a bit chunky). Then add the vegetables and blitz for a few seconds (but still to leave plenty of chunks).

Fill the pre-baked pastry shells with the filling (to the top). I froze some at this point. Bake for around 20 minutes until they start to brown and are piping hot all the way through.

I do think a bit of red pepper in these ones would have made them more visually appealing but they went down a storm with both the children and the parents and can be eaten hot or cold. 


JULES XOXO


Tuesday 29 October 2013

Stir-fry for mini vegans

I was hoping to have all the photos for my party finger food sorted by now as Little Miss has had her first birthday (!!!!! I can't actually believe she is one!) and was meant to have had two parties by now (one for her baby friends and one for the family) but both had to be postponed.  So although I have the recipes pretty much sorted I don't have the photos to go with them.

Anyway on with today's post! For dinner we are having stir-fry which is a favourite in our household but I hadn't yet bubbafied it for Little Miss. Usually when I am making stir-fry I use lashings of soy sauce and mirin (a rice wine) but due to the salt and alcohol in these I wanted to leave these out for LM. I remember another mum telling me that she used lemon and ginger as a sauce for her little one so I used this idea and it turned out delicious. Despite struggling with eating at the moment due to teething, LM enjoyed this a lot and ate more than I expected.

This is a very rough recipe and quantities and ingredients can be easily swapped. This made enough for LM and a small portion for me

Ingredients:

1-2 tablespoons of sesame oil or stir-fry oil
Cube of frozen fresh ginger (I have found these and the garlic cubes invaluable for speedy cooking and you know it won't go off). Use fresh grated ginger if you have it though.
3 tablespoons of lemon juice (add more if you prefer)
3 handfuls of ripped greens (LM's dad was very surprised that there is a vegetable just called "greens"!)
Half a courgette, grated
A handful of cherry tomatoes, halved
A portion of noodles (we used dried wheat noodles and boiled them in water before adding)

Method:

Heat the oil, ginger and lemon in a saucepan

Add all the vegetables and fry for a few minutes.

Add the noodles and cook until all the greens are soft.

And you're done! It's so simple, takes hardly any time and you can use lots of vegetables that are in your fridge. Using frozen fresh ginger and dried noodles means you can have the ingredients in almost always as long as you have some veg in the fridge.


JULES XOXO


Monday 30 September 2013

Finally a bit of normality is being restored!

Well we have been living in our new place for 2 weeks now and it still looks like a Tasmanian devil has hit after eating a bucketload of sugar! I am really enjoying having a spacious kitchen. I now have a bread machine so I can easily make low salt and sugar bread which Little Miss seems to love!


I haven't properly finished any new recipes recently but I thought I share how we make our own organic almond milk at home.

We have been loving almond milk for a while now. It is great for hot drinks, cereals and cooking and also doesn't seem to put dairy-drinking guests off as much as soya milk can do. When looking at the ingredients I was a bit disappointed at how many ingredients other than almonds and water there were so we decided to try making our own.


This is our method:

Soak around a cupful of plain "raw" (I think almonds usually have a heat treatment) almonds in water overnight. This softens the almonds.

Drain the water and give the almonds a bit of a wash. 

Put the almonds in a blender with around 4 cups of water. Vanilla extract and/or dates could be added for a bit of sweetness but we usually have it plain.

Blend for a few minutes.

Next you need to strain it. We use cheese cloths which are basically fine muslin but you can get nut milk bags and I actually find a fine sieve gets rid of most of the almond bits. Make sure you squeeze the cloth or bag at the end to get out all the liquid you can.

And there you have it, almond milk! You can use the almondy stuff left over in things like curries or add it to porridge. I have also heard of a fudge that can be made but I haven't tried it yet!


Hope you enjoy,

JULES XOXO


Tuesday 3 September 2013

Busy busy busy!

It is actually chaos in our house right now. We start moving at the end of this week so there has been lots of packing, cleaning and stressing!

Most of Little Miss' meals recently have been very quick and simple. I have also been using up my freezer stash.

So I don't have too much of a gap in the blog I thought I'd tell you all a few of the meals LM has been having. There is no real need for recipes for these kind of things as quantities don't really matter and you can make it your own. Some of these have pictures and some don't...sorry!

So, we have had:

Couscous with roasted vegetables:


Spaghetti with tomato, vegetable and bean sauce (I blended the sauce):


Potato cakes made by frying patties of mashed potato, spring onions and grated courgette


Some homemade potato and vegetable fingers. This was a similar idea of shaping mashed potato and cooked vegetables into a finger shape and baking them


Pasta with some tahini, soya yoghurt, chickpeas and tomatoes


We have also had a mild curry with rice, some tortilla wraps with vegetables and houmous and some quinoa and vegetables. 

I hope you have been having some great successes with your baby-led weaning. I will be back soon with some more recipes (and a much bigger kitchen! Yippee!)

JULES XOXO

Saturday 24 August 2013

Sugar free banana bread

I've been looking for recipes for snacks to have in the day other than our staples of fruit, veg and rice cakes! 

I found lots of recipes for banana bread but ended up creating my own using the others as a guideline. It made a lovely moist and dense cake perfect for mini fingers. It has only 5 ingredients. The bananas for this are best if they are very ripe, i.e. lots of brown spots, as they mash up really well and are sweeter as the starch turns into sugars. I cook this in a loaf tin but if you don't have one a cake tin would be fine too.

Ingredients

5/6 ripe bananas
2 cups plain flour
1 cup raisins
2 teaspoons cinnamon
1 teaspoon baking powder
(You may need a splash of non-dairy milk if your bananas do not make the dough wet enough)

Method

Preheat the oven to 180 degrees Celsius.  

Line and grease a loaf tin/cake tin

Mash the bananas into the flour

Add the other ingredients and stir in well.

If the dough is dry add a bit of non-dairy milk. It should be a very thick dough that sticks to the spoon but still shiny and wet.

Pour into your tin and bake in the oven for around 25-30 minutes. The top of the bread should have gone darker brown and a knife should come out clean when it has pierced the cake.

I enjoy a warm piece of banana bread so no need to fully cool down if you can't wait (but obviously make sure it is cool enough for the babies and children!),

The raisins and cinnamon of this recipe really complement the textures and flavours of the cake. It is lovely and sweet despite there being no sugar in it and the high fruit content means it is pretty healthy.

We enjoyed this for both snacks and breakfast. In our hurry to eat it I never managed to take any pictures. Sorry.

JULES XOXO


Tuesday 20 August 2013

Vegetable fritters

I have been trying to do some sort of meal planning this week so have been trawling the Internet for ideas for some nice recipes suitable for all of us. Of course most baby-led weaning websites aren't vegan but there quite a few vegetarian recipes out there. I saw one for butternut squash and sweetcorn pancakes which sounded really good for finger food. I hadn't really considered savoury pancakes like that before.

If you've seen pancake recipes before or cooked non-vegan pancakes you'll know thy then to have egg and milk in. Obviously you can substitute both of these relatively easily (non-dairy milk for the cows milk and flaxseed/banana/egg replacers etc) but I decided to make more of a dense fritter style instead. To be honest this was really because I didn't have any suitable egg replacers in!

Little Miss' daddy doesn't really like sweetcorn much and I only like the kind straight from the cob so I used courgette (zucchini) instead.

Ingredients

100g butternut squash
100g courgette
150g flour (all purpose)
Non-dairy milk (rice milk isn't recommended for babies)
Some vegetable/sunflower/olive oil

Method

Steam the vegetables until soft  (I used a metal sieve over a boiling pan of water with a lid  on top. No fancy steamers here!). 

Mash together with the flour.

Add non-dairy milk until a thick batter forms (still sticks to the spoon but is quite gloopy).

Heat up some oil in a frying pan. About 2 tablespoons will probably do.

Fry spoonfuls spread into small discs (ours were about 4cm across). They will probably need just a few minutes each side until they are golden brown.

Let them cool down on some kitchen roll to absorb some of the excess oil.

This made about 12 small fritters. We each had 4 each (LM didn't consume all 4 but 4 were needed for the obligatory "throw some on the floor" and "mash some on my head" purposes". LM's daddy and I had some extra vegetables and sweet chilli sauce with ours.

These went down a storm with everyone and were perfect for a weekend lunch all together. They would work with so many other vegetables so give them a go and tell me how yours went!


JULES XOXO

Thursday 15 August 2013

Barley "risotto"

Little Miss' daddy "doesn't like rice" and yet risotto is a staple favourite in the household along with curry. I think this is a bit like his "I don't like coconut" and yet he eats and likes everything I give him with coconut in it! 

We probably have a risotto every couple of weeks so to mix it up a bit we made it with pearl barley tonight. Barley is full of nutrients and brings a bit of a nutty flavour to the risotto.

I tend to put whatever vegetables we have in the fridge into the risotto. Tonight it was marrow, mushrooms and tomatoes.

Ingredients

2 tablespoons oil (we uses sunflower)
Half a large onion, diced
1/3 of a marrow/a whole courgette, cubed
300g mushrooms (about 8-10 closes cup mushrooms), chopped
1 1/4 cup dry pearl barley
A baby vegetable stock cube (I.e. very low/no salt)
3 largish tomatoes, chopped

Method

Fry the onion for a few minutes in the oil then add the marrow and mushrooms and cook for a further 5-10 minutes so they are softened.
Make up the stock according to package instructions.
Add the barley to the saucepan.
Add half the stock and stir intermittently until the water has been absorbed.
Add in the rest of the stock and continue in the same manner.
The pearl barley pack instructions seem to vary but tend to say to cook the barley for an hour to an hour an a quarter. It should be soft; a sort of pasta consistency. You may need to add in some extra water if it all gets absorbed and needs more cooking.
Add in the chopped tomatoes about 5 minutes until the end.

This made enough for all 3 of us to have for a meal as well as a couple of extra baby portions for the freezer.

Excuse the bad phone picture!


I like mine with a little bit more seasoning but added at the table to keep it baby friendly.

Enjoy!

JULES XOXO

Monday 12 August 2013

Arriba! Fajitas!

Sorry it has been an absolutely ridiculous time since I posted anything on the blog. I have been taking photos of Little Miss' food but we have had so much to do as we are moving! However, being a mum I am always busy so I just need to find the time to write even if it means writing on my phone like I do now. 

A few weeks ago, Little Miss' dad and I fancied fajitas, something we used to have a lot before LM was born. We have ours really spicy so we adapted it to make it less spicy and added more spices after.

I wasn't organised or skilled enough to make my own tortillas this time so they were ready made and the rest of the recipe is really simple. You can use most vegetables in this but we tend to go for the usual peppers, onions, tomatoes and mushrooms with a side of beans.

For the 3 of us (although I made extra for next day's lunch) I probably used 2 peppers, one small red onion, six mushrooms and 4 medium sized tomatoes. These were sliced and fried in some olive/vegetable oil with the onions going in a few minutes before everything else. 

In a separate saucepan I cooked some red kidney beans with some chopped tomatoes (about half a 400g pack/tin), mashing the beans up as I went.

For us I added in some BBQ sauce/liquid smoke into the beans and spices into the veg but left it out for LM.

Simple as that! I would recommend guacamole with it but I am allergic to avocados (boooooo!) so we don't have it. Some soya yoghurt and/or vegan cheese are also nice additions.

We ripped LM's tortilla into smaller strips to make mini fajitas and she also grabbed some of the mixture in her hands just to eat by itself.

I love fajitas so was very happy to find LM  enjoyed them too.


JULES XOXO

Monday 22 July 2013

Creating simple sandwich spreads

I make Little Miss' dad lunch most days for work. Sometimes it is extra dinner left over but often it is sandwiches. We have always struggled to find more inspiring things than different forms of houmous with salad/roasted veg (although we love houmous and there were quite a few variations. 

Sandwiches are a great thing to take out for Little Miss if we are having lunch on the go but I didn't want to end up in the same situation of only having one proper sandwich filling. 

A few posts ago you may remember the sandwich I made with spinach and mushrooms (among other ingredients) which didn't look particularly appetising but was delicious and liked by Little Miss. This week I decided to try a different vegetable filling and realised the possibilities are pretty endless! Any vegetable/pulse/herb can be used to create delicious spreads perfect for sandwiches.

This makes enough for at least 5 thickly spread sandwiches (probably more as I kept eating it off the spoon!)

Ingredients
Whole aubergine (eggplant)
1 cup cooked lentils (any colour)
Half a sweet potato
One red onion

Method
Roast the vegetables in the oven until soft and browning.
Meanwhile cook the lentils as per instructions on the packet
Blend with stick blender/in food processor until quite smooth but some lumps are fine and I think actually add to it.

It is so simple and just shows one example of what can be done.


Enjoy creating any spread you fancy and experiment!

JULES XOXO

Wednesday 3 July 2013

Lemon and Blueberry Scones

These have been in the pipeline for ages and in fact I've had to buy the lemons I wanted for them twice because I kept getting distracted by other things and the lemons got used. I finally made them last week and I was not disappointed at all. They are not as dry as scones and have a nice shiny sheen on them like sticky buns. Again I didn't use any sugar in them; banana and blackstrap molasses were used instead. These were a perfect way to mix up our breakfasts (usually it is porridge or toast with no sugar jam or fruit) and a good thing to have as a quick snack if needed. Here is the recipe:

Ingredients:

1 cup plain flour
1 tsp baking powder
1 mashed banana
1 tbs blackstrap molasses
Zest and juice of 1 lemon
Handful of blueberries

Method:

Preheat the oven to 180 degrees celcius. Mix the flour and baking powder then stir in the mashed banana (the riper the banana the better), molasses, zest and lemon juice. Finally stir in the blueberries. Form into around 8 round shapes and bake on a greased/lined baking tray for 10-15 minutes until firm to touch (a bit springy) and a medium brown colour (the molasses gives it a lovely brown colour). Let them cool down and store in an air tight box. These only last a few days so freeze some if you don't think you will use them in time.

Mini scones for mini fingers

I definitely enjoyed having these for breakfast with Little Miss. They have a big lemony hit which works really well alongside the blueberries and the deep molasses flavour. Enjoy!

JULES XOXO

Thursday 27 June 2013

Useful tools we have found...

I have got a few recipes lined up to make and post about but recently we have been VERY busy so I have found myself utilising quite a bit of my freezer stash and also doing a lot of roasted and steamed vegetables because these are simple and yet Little Miss finds them delicious. I think part of the reason she likes them is that they are really good to get a handle on herself whereas some of the other foods can be a bit crumbly although a great learning experience for handling them.

Anyway, to keep up with posts I have decided to show you a few of the things we have found to be particularly useful for baby-led weaning.

1) the "highchair". We have a high-chair which attaches to the family table so that Little Miss can sit directly with us at the table to eat. It looks a bit like a levitation act! This works for us but may not work for other people for example you cannot use these on glass tables. Plus, even though it has rubber covers to protect the top of the table, it does leave slight marks underneath. If you get a free standing high chair I would really advise getting one with adjustable tray positions and possibly even adjustable height positions.

Our "highchair"

2) Floor protection! I'd say at least half of most meals ends up on the floor and it can be a nightmare to clean up so we bought some wipeclean floor mats to put underneath the table. The one in the picture is the one we use at the house. It is really big (although folded in half here) so can go below the entire table. It is also quite heavy which makes it easier to wipe down. I also bought a couple of lightweight waterproof picnic mats to take with us to other people's houses (or to have picnics on!) which are less bulky to carry with us.

Our floormat
3) Food mat. We have various bowls and plates for Little Miss but I think the best thing we have for her to eat off is a silicone mat which suckers on to the table. It is easy to clean and Little Miss can't do what she likes best which is to throw it/drop it off the table.

Our foodmat

3) Long-sleeved bib. These are an absolute must as food gets everywhere. Dribble bibs and ones that just cover the chest do not cut it. The longer the bib the better as well. Here is Little Miss modelling one of our many long-sleeved bibs (I think we probably have 8-10):

Long-sleeved bib

4) Cups. Lots of mums rave about the cups which don't spill when they go upside down. This might be great for mum but actually it does not teach the child new skills and really about the physics of liquids. Instead, the sippy cups or normal cups tend to be better. We tend to use sippy cups more as they are easy to take out filled with water but also use a doidy cup at home which has one side longer than the other to be a middle step between a sippy cup and a normal cup. Little Miss likes both of these now but the sippy cup has less spillage (although she does enjoy turning it upside down and watching the water pour out).

Orange sippy cup and purple doidy cup

Other than that it helps to have some baby spoons and bowls/plates etc. but really teaspoons and normal bowls can be used too..you just need to be a bit more careful.

Anyway I hope that has given you some ideas of what might be useful although everyone is different.

JULES XOXO


Friday 21 June 2013

Simple vegetable and coconut stew

Today has been a bit chaotic, well this afternoon really, which has meant I had not planned dinner for Little Miss and had hardly anytime to prepare it. We had a few vegetables in the fridge so I decided to do a simple stew. i won't put quantities down as you can put whatever you have in and use any vegetables you fancy but I will tell you what I did.

I fried some onions in some sunflower oil for a few minutes and then added chopped carrots and butternut squash. These cooked for about 8 minutes (I added some extra water in but be careful if you do this can it can react with the oil and spit) then I poured in some passata and added some dessicated coconut (coconut milk or cream would also work and it would be perfectly fine without the coconut but I wanted to add a bit of extra fat and flavour).


And here it is:


Such a quick and easy meal you can do with little time and whatever vegetables you happen to have in. I must admit, despite it's simplicity I really loved it myself and would happily wolf down a couple of bowls.

JULES XOXO

Tuesday 18 June 2013

Spinach, mushroom and butterbean sandwich filling

I don't know about you but we seem to get stuck on houmous and salad/roasted vegetables as our sandwich fillings. I try to mix it up by making different houmous flavours but it still is nice to try different things. I hadn't tried Little Miss on spinach yet and we had mushrooms to use up so I decided to create a new sandwich filling from these things. The recipe below makes several sandwiches worth for mummy and baby so you may want to reduce the quantities.

Ingredients

-A couple of handfuls of cooked spinach. I used about 8 frozen blocks of spinach (sorry about the mismatch of measurements in this recipe. My brain obviously wasn't fully engaged when I tried this out).
-4 large mushrooms or the equivalent in small
-2 cloves of garlic
-a 400g tin of butterbeans or the equivalent of homecooked butterbeans
-some olive oil/vegetable oil for frying

Method

- Fry the garlic (minced) and chopped mushrooms in the oil until soft and tender
-Cook/defrost the spinach if uncooked
-Put all the ingredients into a food processor and whizz up until it is a little smoother.
-If you don't have a food processor when you chop up your mushrooms make the pieces quite small. Also mash up your butterbeans with a fork. Then the ingredients can all be mixed together.

It is such a simple recipe and a great way to get your little one to try different vegetables and to boost your own vegetable intake. We had it in sandwiches, as a dip for rice cakes and also for vegetables.

The photographs don't really advertise it very well because it is not exactly pretty but it was really popular with Little Miss, especially when the rice cakes were dipped into it.

On mini rice cakes
Not the prettiest but still pretty yummy 
Have to have one for each hand obviously!

All in!
You may notice that it is white bread that is used. We are usually a wholemeal seeded bread kind of family but for little ones the fibre fills up their tummies too much to get enough calories in so white bread is usually recommended (as far as my research has shown me but please check this out for yourselves especially since guidance is always changing!).

I hope the look of it doesn't put you off. I really enjoyed this sandwich filling and will definitely be having it again myself.


JULES XOXO

Wednesday 12 June 2013

Carrot, orange and ginger muffins

I think these are my favourite recipe that I have experimented with so far. Originally I had planned a carrot and apple muffin as I knew I had some apples to use up but when I got them from the fruit bowl I found they were a little too far gone. I had plenty of lovely big oranges so decided to do something with them instead.

I made mini muffins and this recipe made about 15 of those but would maybe make 8ish normal sized muffins.

Ingredients

3 medium carrots
Juice and zest of 2 large oranges
2 mashed bananas
2 tbs blackstrap molasses (information about blackstrap molasses below the post)
2 cups plain flour
2 tsp baking powder
2 tsp ginger powder

Method

Grate the carrots finely into your mixing bowl then add the orange juice, zest and bananas and mix well. Then stir in the molasses. Sift in the remaining ingredients and stir well. There is no need for sugar in this recipe as the molasses and banana sweeten it enough and the banana also acts as a binding agent. Spoon into your muffin cases or greased muffin tins and bake in a preheated oven at 180 degrees celcius. mine took around 15 minutes to cook (when a knife comes out clean) but larger ones may take longer and shallower ones may take less time.
I was going to try and freeze some of these but they were very popular with all of these so they are disappearing to fast. They were a big hit with Little Miss and are great for breakfast or as snacks. 


Blackstrap molasses
Blackstrap molasses are a byproduct of the refinement of cane sugar. It contains magnesium, potassium, iron, vitamin B6, calcium and other minerals so makes a healthy sweetener to your foods. I put a tablespoon in my porridge most mornings (and drink a glass of orange juice) to boost my iron. At first I wasn't at all keen on the taste and had to add in naughty golden syrup too but now I enjoy it with just the molasses. It really complements the ginger in this recipe and gives it a rich flavour and just enough sweetness.

Enjoy,

Jules XOXO

Tuesday 11 June 2013

Bubble and Squeak Bites

These little beauties are just 3 ingredients (plus some oil to fry the onions) and make great finger food for little vegans and a great side dish for adults.

All you need are potatoes, cabbage, onion and a dash of oil. I used 4 medium/large potatoes, 500g of cabbage (I used white because that was what I had in the fridge but green would have looked great) and 2 medium onions. This made enough for 3 meals for all of us (with the adults having another dish with it).

Boil the cabbage and the potatoes. If you are cooking them together start the potatoes off first as they take longer to cook. No need to peel the potatoes as there is lots of goodness in the skins (although they do need chopping. I cut them into about 6 pieces each and shredded the cabbage). While these are cooking, fry the onions (diced) in your oil- probably about a tablespoon.

Once all of the vegetables are cooked, mash the potatoes and mix in the cabbage and onions. Fashion into small "cakes". The first time I cooked these I fried the cakes but found that they fell apart but the next time I baked them for about 10 minutes at 180 degrees celcius until they started to brown. When they were baked they held their shape much more easily and was better finger food for mini fingers.

Little Miss really seemed to enjoy these. Next time I may try adding some garlic into the mix to add to the flavours. Nutritional yeast could be added to the mash for a cheesy taste and to add vitamins. You could also add margarine and/or soya yoghurt to the mash to make it more creamy.

These are the fried version and had to be remolded back to shape

These are the baked version

I am not very good at frying foods well (pancakes often turn into what we now call "scramble") so you may have more success with frying  but I like how the baked version is dry and crispy on the outside but fluffy on the inside.

I froze about 20 of these small cakes in the freezer and popped them straight in a warm oven for easy snacks or meals which worked great. These will go with most foods so are very handy to have on standby although I found them quite addictive.

I hope you and your little ones enjoy these.

Jules XOXO


Sunday 9 June 2013

What we have when we are out for the day

Today we went to the V-delicious and Allergy Free shows in London which had lots of vegan options and we came back with much too much shopping. Knowing we would be out for the day I prepared some simple roasted vegetables for Little Miss. We had butternut squash (loved by most babies I know), carrots and aubergine. I also always carry a trusty bag of organic baby rice cakes for emergencies. Apple flavour is both Little Miss' and my favourite.
Little Miss enjoying her carrot
Along the way I also let Little Miss try some of the samples that I was eating too providing they weren't too salty or sugary...she always wants anything I have. Normally I would have shared my lunch with her but there were so many samples to try that I didn't need lunch which is why I was so glad I had prepared the vegetables to take.

Jules XOXO


Saturday 8 June 2013

Lentil Shepherd's Pie

I was sent a link by a friend to a shepherd's pie recipe with a potato and parsnip topping which, other than the meat, sounded delicious. She had made it vegetarian using lentils and soya mince so I thought I would give it a go too.

I made this before deciding to do this blog so I didn't record the measurements I used properly but with recipes like this common sense will get you there! I have estimated what I used to make Little Miss, Mister L and I 3 very decent portions, 2 of which I froze.

Ingredients
250g lentils
6 medium parsnips
6 medium potatoes
half a courgette (zucchini)
half an aubergine (eggplant)
1 large carrot/2 medium carrots
500g passata
About 40g textured vegetable protein (TVP)/dried soya mince

Method
The first thing to do is to cook your lentils. My instructions said to rinse them well, boil them for 10 minutes and then simmer for a further 35 minutes but others may be slightly different!

Along side this boil the parsnips and  potatoes cut into chunks (wash them but no need to peel as there is lots of goodness in vegetable skin). I find they are usually done in about 10 minutes (once they are nice and soft because they need mashing!). These can be mashed and put aside. I didn't this time but a knob of margarine or some soya (or other non-dairy yoghurt) can be delicious. Don't add salt at this time so your mini vegan doesn't get extra sodium!

Once the lentils are cooked, grate in the courgette, aubergine and carrot while still on the heat. Then add in the passata. Then finally stir in the TVP or soya mince.

The lentil, vegetable and mince mixture can then be put into an oven proof dish and topped with your mash. This is great for freezing into portions for other days or otherwise can be cooked in the oven straight away. For this put your oven at 180 degrees celcius for about 20 minutes when the topping starts to get a bit crispy.

The first time I made this it was a massive hit with Little Miss but tonight she got very distracted by her water cup although she still made a good go of it. Mr L and I really enjoyed it both times though so it makes a great dinner suitable for all the family and brilliant for making in bulk for later meals! For me, making things in advance is a necessity for a lot of meals and I usually cook or prep while Little Miss is in bed ready for the next day unless Mr L is home before dinner.

Lentilly goodness!

More interested in licking the bottom of her sippy cup


This is a very delicious recipe and the parsnip mash just makes it that little bit special. I have to admit I like to add a bit of salt to my portion and the original recipe had spices in the mash so a splash of chili sauce is also a great addition for the adults.

Bon appetit

Jules XOXO


***EDIT: the person that sent me the recipe noticed I hadn't added in the turmeric and coriander into the mash that was in the recipe! This was not intentional I was just doing my usual of reading a recipe beforehand rather than following it so I completely forgot. I bet these would make an amazing addition and I will definitely be adding them next time! She also mentioned adding in cumin which sounds delicious. Cumin, to me, is one of the best spices around!***

Friday 7 June 2013

Aubergine Pizzas

Tonight's dinner was really simple and yet probably one of the most well received dinners by Little Miss!

I remembered a pinterest page I had seen about courgette pizzas and had wanted to try them out. We didn't have any courgettes to hand but I had bought some absolutely beautiful aubergines (or eggplants).

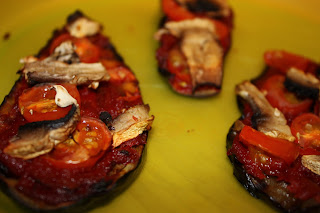
First, slice the aubergine length ways so the slices are a couple of millimeters in depth. As aubergines take a little longer to cook than courgettes I griddled (a frying pan would be fine too) them with a little olive oil until they were softer. Then they can be put on a baking tray and topped with tomato purée and vegetables. I chose to keep it quite simple with cherry tomatoes and mushrooms but may branch out a bit more next time! I didn't add any vegan cheese but I'm sure that would be nice too. At the moment I am keeping things as un-processed as possible but may try some homemade cheese soon. Once the pizzas are topped they can be put in the oven. It takes hardly any time at all to cook. Probably around 5 or 10 minutes in an oven at 180 degrees celcius depending on the thickness of your pizzas so keep checking to avoid burning.

Once they come out they should look something like this:

Fresh from the oven

For Little Miss I cut these into more manageable slices but kept them this size for me and Mr L. I don't really need to tell you to let them cool down before giving them to babies but feel I should write it somewhere!

As you can see they went down a treat:

YUM!

Passing the food inspection

It always ends up in the eyebrows

I LOVE aubergine but these would be equally great on courgettes I'm sure. They make a great quick and healthy meal!

Enjoy, Jules XOXO

Hello and welcome...

Hi! My name is Jules and I have an amazing mini vegan who I will call Little Miss! Although my partner is not vegan we have decided to bring Little Miss up as a vegan! Yay!

A lot of people look a bit shocked when we say we are bringing up our child vegan but let me assure you it is perfectly healthy provided the right care is taken which goes for every type of diet! Plus it can have many beneficial health effects. Although we are not from America I want to quote The American Dietetic Association because they have a very clear and well written statement saying "...that appropriately planned vegetarian, including total vegetarian or vegan diets, are healthful, nutritionally adequate, and may provide health benefits in the prevention and treatment of certain diseases. Well-planned vegetarian diets are appropriate for individuals during all stages of the life cycle, including pregnancy, lactation, infancy, childhood, and adolescence, and for athletes.".

But why are we vegan? There are several reasons! Firstly we are vegan because we don't want animals to have to suffer or die for our food when we can be perfectly healthy without that. In addition to this, eating plant-based foods means there is enough food and water to sustain the whole world population; much of the plant foods grown go on raising livestock and also producing 1 kilogram of meat takes a lot more water than producing a kilogram of cereals. Vegan diets are also better for the environment and a well-balanced vegan diet has great health benefits. If you would like to know more then I would suggest visiting the Vegan Society website as a starter but there is a wealth of information out there.

If you have found my blog then you probably know what baby-led weaning is but in case you don't here is a little breakdown:

Baby-led weaning throws out the idea of force-feeding babies with purées. Instead, it puts the power in the hands of the babies. Just like babies learn to crawl and walk and talk on their own this process allows them to explore food for themselves. By providing them with food they can handle themselves and put in their mouths, they decide whether they want to eat something or not and only swallow when they are ready. It may sound a little scary but babies have a good gag reflex that is further forward. There can be gagging (but this happens with purées too) and there are rare instances of choking. However, choking also can occur when purées are fed, in fact I have read somewhere (sorry I don't have the source) that there may be more choking instances with purées because the babies are not in control. By letting them take control they can actually learn faster and also tend to have a better relationship with food and mealtimes; being force-fed purées is not fun! If you are new to baby-led weaning, please read all the proper information first. There is a brilliant book by Gill Rapley and Tracey Murkett which gives great insight into this process and provides all the information you need to get going. It doesn't matter if you started with purées, you can begin baby-led weaning at any time!

Just to add:
Not all babies may take to baby-led weaning. Purée feeding is not the wrong way by any means and may suit some babies better. Baby-led weaning is just another possible approach to introducing complementary foods.

Little Miss is now seven and a half months old. We started baby-led weaning when she was five and a half months because she grabbed a piece of cucumber from my plate, put it in her mouth and started "chewing" (she has no teeth yet!). For the first little while we mainly gave her sticks of cooked vegetables and fruit. We then branched out into some pitta bread fingers and houmous and other simple foods but now things have got more exciting! We are now having foods that the whole family can have although often we have our bigger dinner later as well as a snack with Little Miss. I wanted to start this blog so that I could document the foods that I make for us and to help create a small resource from which other mums can get inspiration!

I hope you enjoy reading this and trying out the recipes as much as I enjoy making them!

Broccoli and cucumber are definitely favourites for simple finger food!

Jules XOXO